Hanging nodes in trees
Nate / November 2025
note: I include links to products in this article but they’re not affiliate links.
You know what they say about radio placement - Height is Might! Not all of us have the luxury or means to put up a radio tower. You might be wondering, if only tall things just grew up out of the ground that we could use… Well I have news for you :D
We’ve been spending some time developing some models and techniques to quickly, safely, and cheaply (oh, also reversibly) get a solar mesh node nice and high up in a tree. The design goals for this project are as follows:
- Must be easy. No tree climbing nor heavy lifting required.
- Must be cheap. Avoid expensive mounting hardware and prebuilt units. With radio and battery, I can build and deploy one of these nodes for about $45-50 in parts!
- Must be lightweight. Easy to lift, doesn’t need strong branches, limits fall damage.
- Must be reversible. We want to be able to pull nodes down to troubleshoot or update them.
- Must be solar. Running power cords to the sky is total lightning bait.
I’m very happy with what we’ve developed and I’m pleased to share our findings with you!
Components
Any solar tree node will need these components:
- Radio
- Battery
- Solar panel
- Power circuitry
- Case
- Hanging hardware
- Anchoring hardware
Radio
The cheap radio part is fulfilled by the Jank mesh node hardware - no need for the case, just the carrier board will suffice. But use whatever radio you have on hand! Note that some radios such as the Washtastic and Wio Tracker have solar charging hardware built in, some of them have USB charging that you can use, and some have no charging circuitry at all. Be mindful of matching the solar panel power with the charging circuitry!
The Jank radios have an internal 5V charger that can be rigged for 500mA (2.5 watt) charging. This can be sufficient for lower-power nodes or more equatorial latitudes. In the Pacific Northwest, we generally need higher charge currents to make better use of the short sun breaks we get among the grey weather. More on that later.
Battery
The battery is important to supply power to the radio at night or when there’s not enough light. I like to use Lithium-ion 18650’s of at least 3000mAh capacity, but make sure to size it for at least a full day’s usage for your node without charging. For lithium ion batteries specifically, make sure you get protected cells or add your own protection PCB to prevent overdischarging of the cell, which would damage it permanently. I prefer the 18650 protected button-top cells from EBL or Li-ion Wholesale.
You can also go with LiFePO4 batteries but there are fewer chargers available for them.
Solar Panel
Solar panels collect sunlight and convert it into electricity. They come in all sorts of shapes, sizes, and voltages. More still, the wattage ratings especially on cheap panels can vary wildly and unrealistically. I personally use 10-watt 5-volt solar panels made for security cameras, because they’re widely available and have an internal 5-volt regulator that makes them work well with the chargers that most radio node hardware includes. Various brands come and go as the solar surplus market waxes and wanes, but I have had good results searching Amazon for 10W 5V USB solar panel - they usually have a 1/4-20 mounting screw hole on the back that I connect to with my printed tree node case.
I wouldn’t recommend deploying a panel with less than 30 square inches of surface area in the Pacific Northwest. If you’re in a sunnier locale you may be able to get by with a smaller solar panel.
Power circuitry
Power circuitry in a node has a few parts we need to be aware of: battery protection, solar charging, and boost conversion.
Battery protection
Lithium-ion batteries are pretty sensitive to a few things, and it’s important for the battery to be protected. This is accomplished with a BMS / protection circuit that either comes preinstalled on the battery, or you add to a bare cell. It prevents things like discharging the battery too low, charging the battery too high, and drawing too much current (all things that damage it). If you get a cold-resistant cell, the protection board will also limit charging current when the battery is too cold. I recommend getting a battery with a preinstalled protection board, which guarantees a good match with the battery and requires no extra steps (and barely costs more). Lithium-ion battery failures can be dangerous and spectacular, and a little effort to prevent that goes a long way.
Solar charging
As the solar panel generates electricity, the solar charger will safely charge the battery. There are a few considerations to make for your solar charger. It needs to be matched to be able to take the rated solar panel voltage and wattage. For example, a 10 watt, 5 volt solar panel could put out as much as 2 amps of current, and in order to take advantage of that, you’d need a 2 amp 5 volt charger chip. If your charger is undersized, it will not use all the available energy. Which could be okay but you can upgrade. Here are a couple configurations that work:
- Use a 5-volt panel directly connected to the USB input of your radio. It won’t charge very fast (e.g. the Jank’s ProMicro will only use 500mA of the available current) but requires no additional components.
- Use 5-volt panel and a 5-volt charge IC. These are easy and cheap to find at higher currents (e.g. 2 amps for 10 watts). Because they’re not doing power-point tracking for the solar panel, some of the energy is left on the table but it’s better than a trickle charger.
- Get a solar panel and a matching MPPT charger. This is the most expensive method because MPPT chargers cost a premium. You’ll be using the maximum available energy, though.
My preference is getting a 5-volt charger IC because they’re cheap and adequate. We’ve had good results with chargers based on the BQ25185, MCP73871, CN3163, and TP4056.
Boost conversion (optional)
If you’re using a higher power radio like the E22900M30S or 33S and want to take advantage of their maximum transmit power, you’ll need to include a boost converter. These radios will work fine without them but the output power could be cut to as low as 25% at low battery levels without it. The boost converter takes the 2.5-4.2 volts of the battery and uses specialized circuitry to boost it to 5 volts. The radio can then use the higher voltage to hit its maximum transmit power.
Radios like the Ikoka stick and the Washtastic include boost converters already, so you wouldn’t need to add one.
We are currently doing testing on separate boost converters and will update this post with our results.
Case
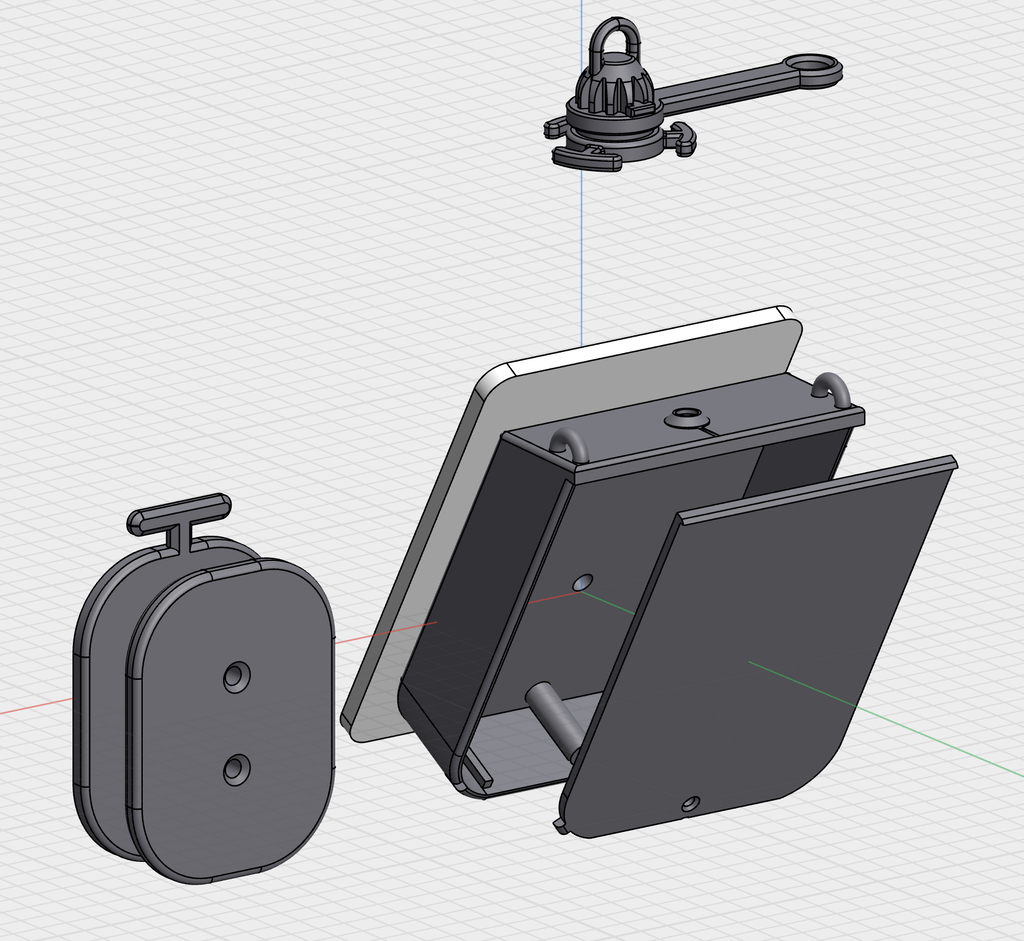
The case needs to meet a few requirements:
- Must keep water and moisture away from the sensitive electronic bits
- Must hold all the parts together
- Must hold the solar panel at an angle conducive to sun exposure
- Must attach securely to hanging hardware
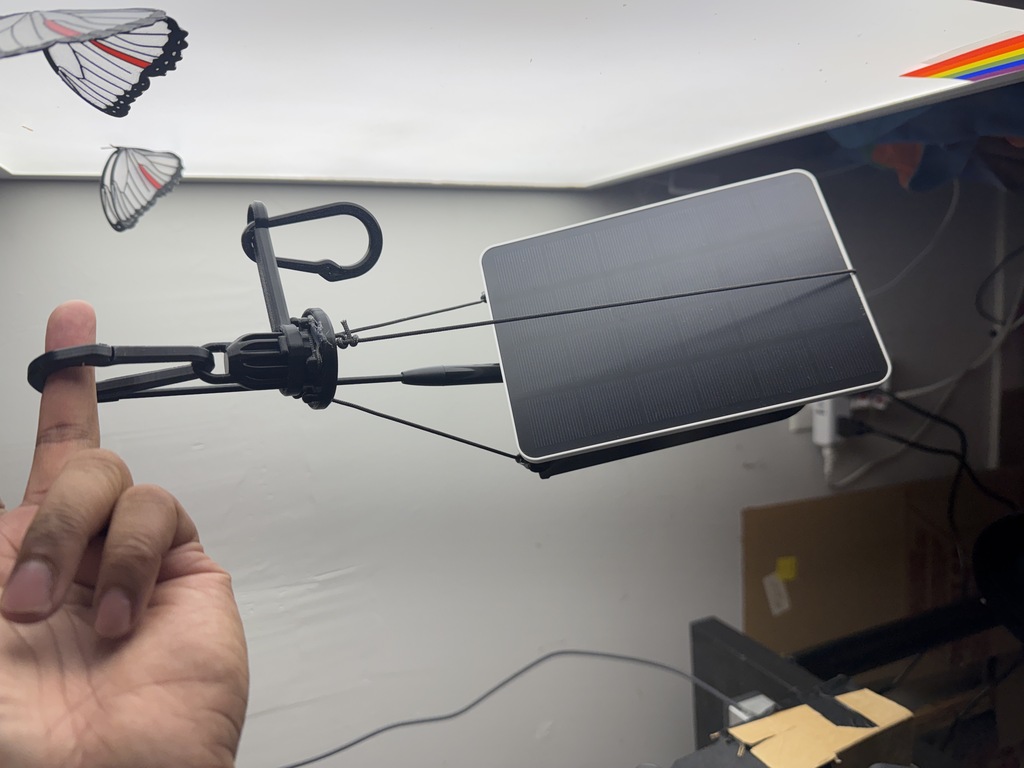
I designed an enclosure to be 3D printed that takes care of rainwater drainage away from the electronics as well as condensation. It mounts to the back of the solar panel, keeping it at a 60-degree angle which is intentionally steep to get the most sun in the winter months. The case also features a SMA port for an omni antenna coming straight out the top, and plenty of room for any radio configuration.
The case has three tie points to rope to the tri-hanger, allowing the whole assembly to be balanced to keep the antenna vertical.
Download the case’s 3D files here: Hanging node 3d printed case files
Hanging hardware
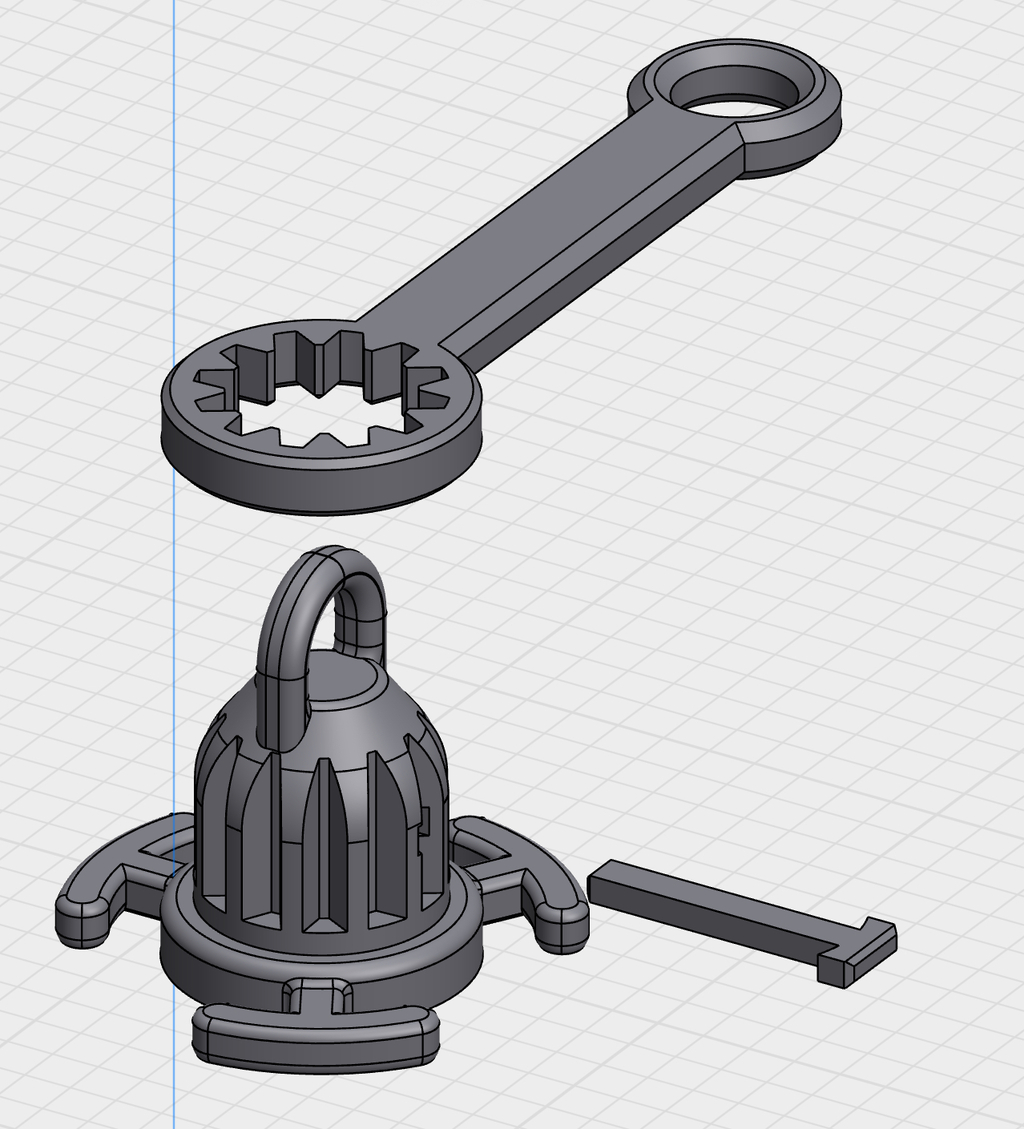
It’s important for the node to be facing roughly south at all times. A single rope hanging from a tree won’t do to keep the node oriented, so I designed a simple hanger to keep the node from rotating. The basic principle is that the main rope attaches to the center of the node, loops up over the tree branch, and comes back down loosely through the hanger’s arm. It’s then tied to the tree or some other static tie point, creating an A-shape that prevents rotation. The tri-hanger’s arm can be moved to any of 12 angles and then locked using a T-shaped locking pin.
The tri-hanger has three cleats to tie the three points on the case, and each rope’s length is adjusted specifically to balance the node such that the antenna is pointing straight up and down. I use a piece of fishing line for the front rope that goes across the panel, to minimize any sunlight blocking.
Anchoring hardware
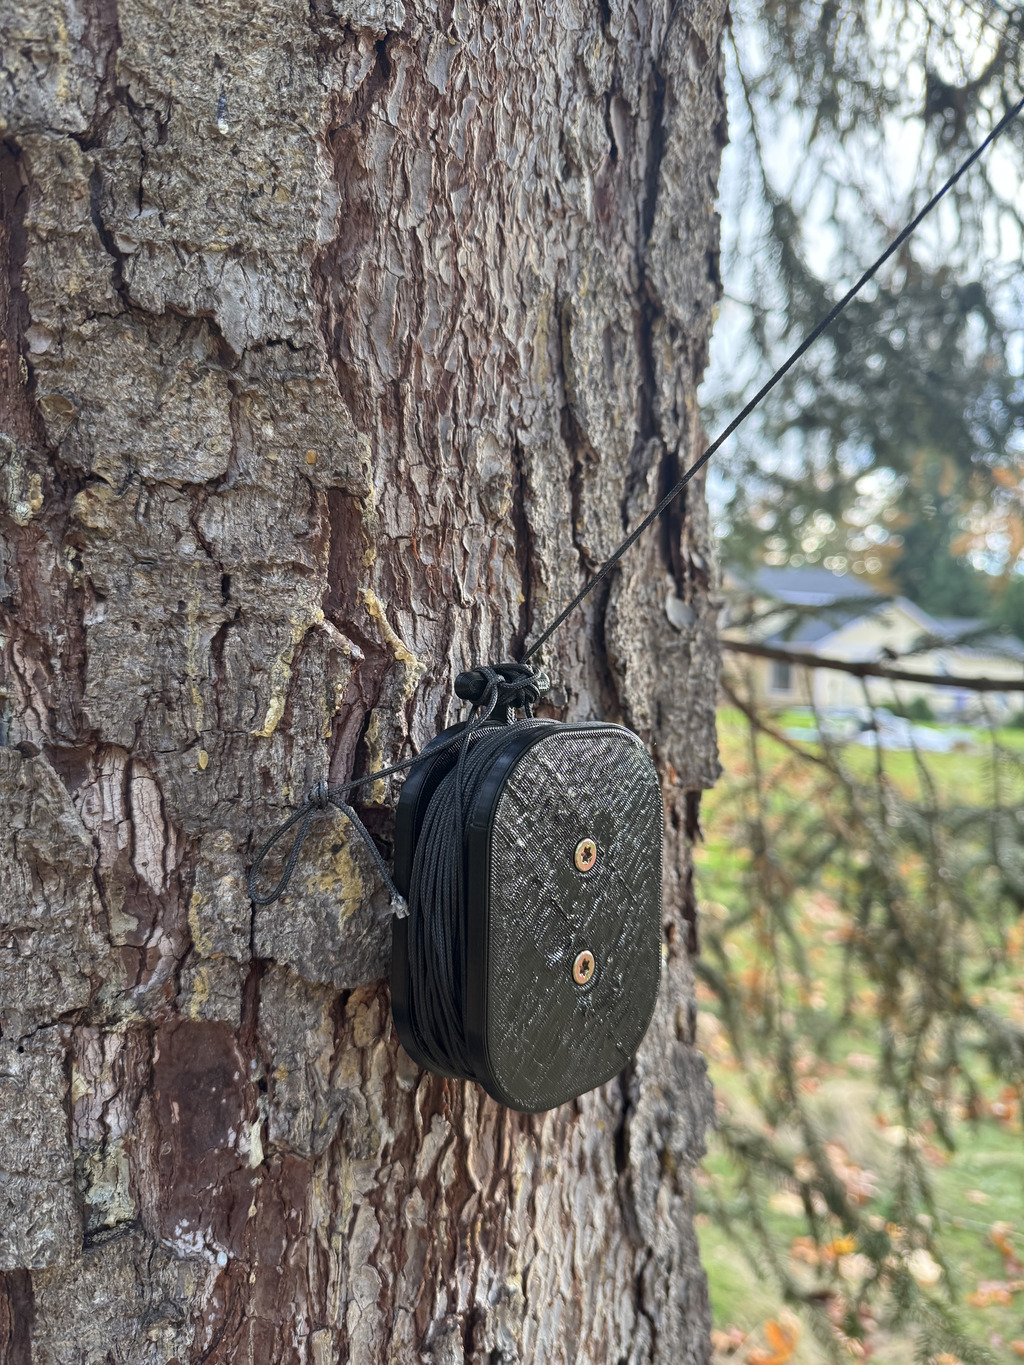
The spool is screwed to the tree’s trunk or nearby stable object to anchor the rope. It’s got a cleat on top to simplify the tying-off process and a spool to wind up excess cord. Make sure you have twice as much cord as the height you expect to hang the node.
I’m using 2mm paracord because it’s got plenty of strength and is lightweight enough for the fishing line to pull it up and over the tree branch.
Putting it all together and testing
There are a lot of parts here, and I’m not going into all of the connections and soldering you’ll need to do to get everything together. Make sure to check and double-check your connections before connecting the battery and solar panels, and put your node outside at ground level for at least a few days to monitor it and make sure it is working and sustainably gathering solar power.
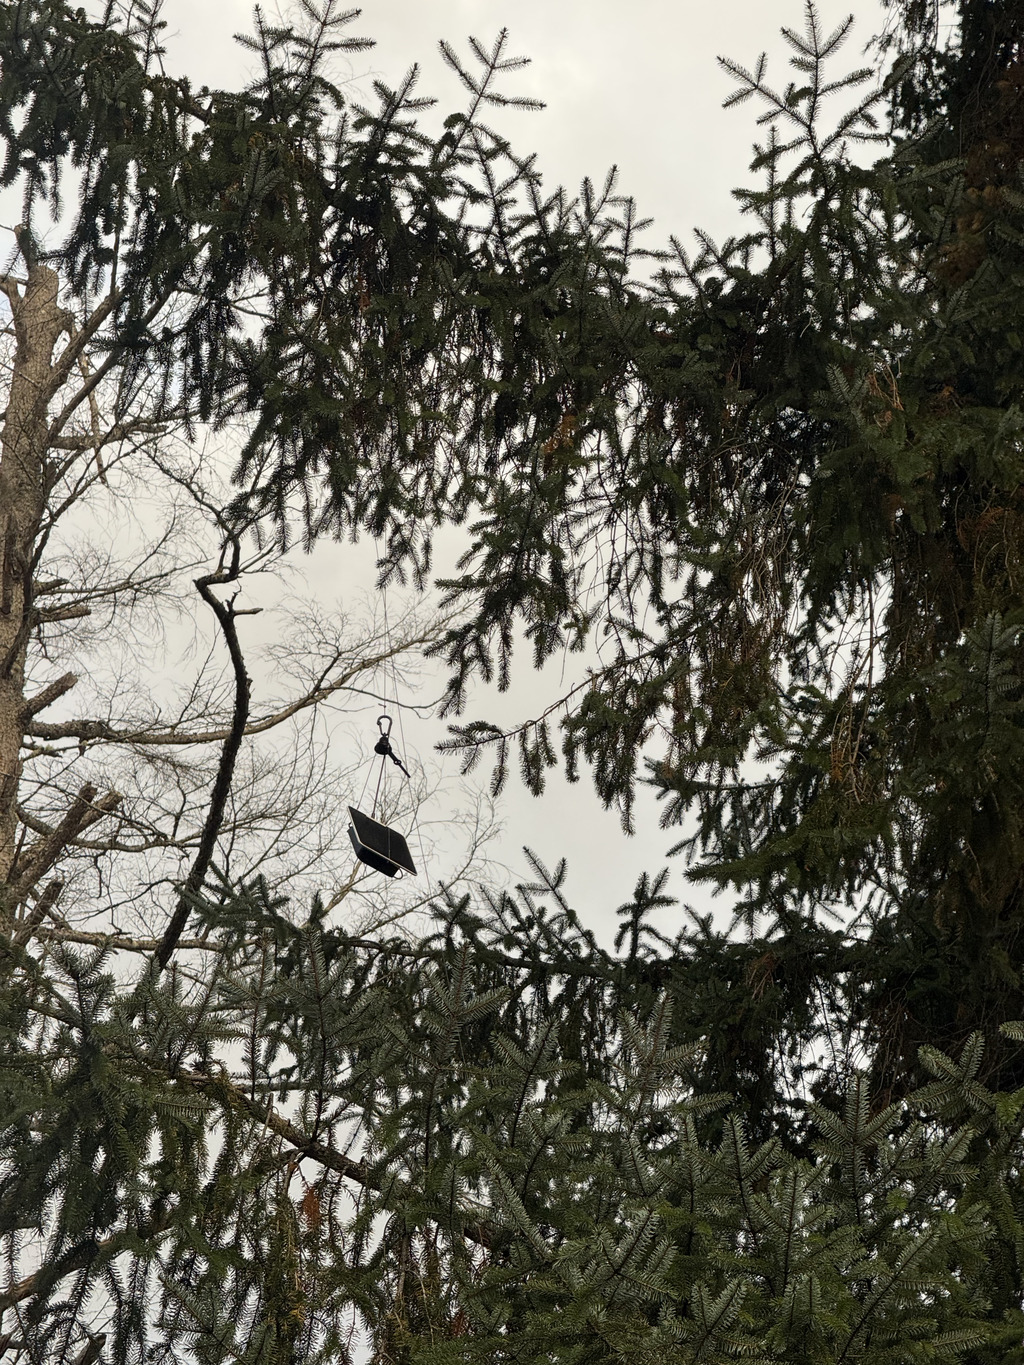
Finally: Hanging the node in a tree
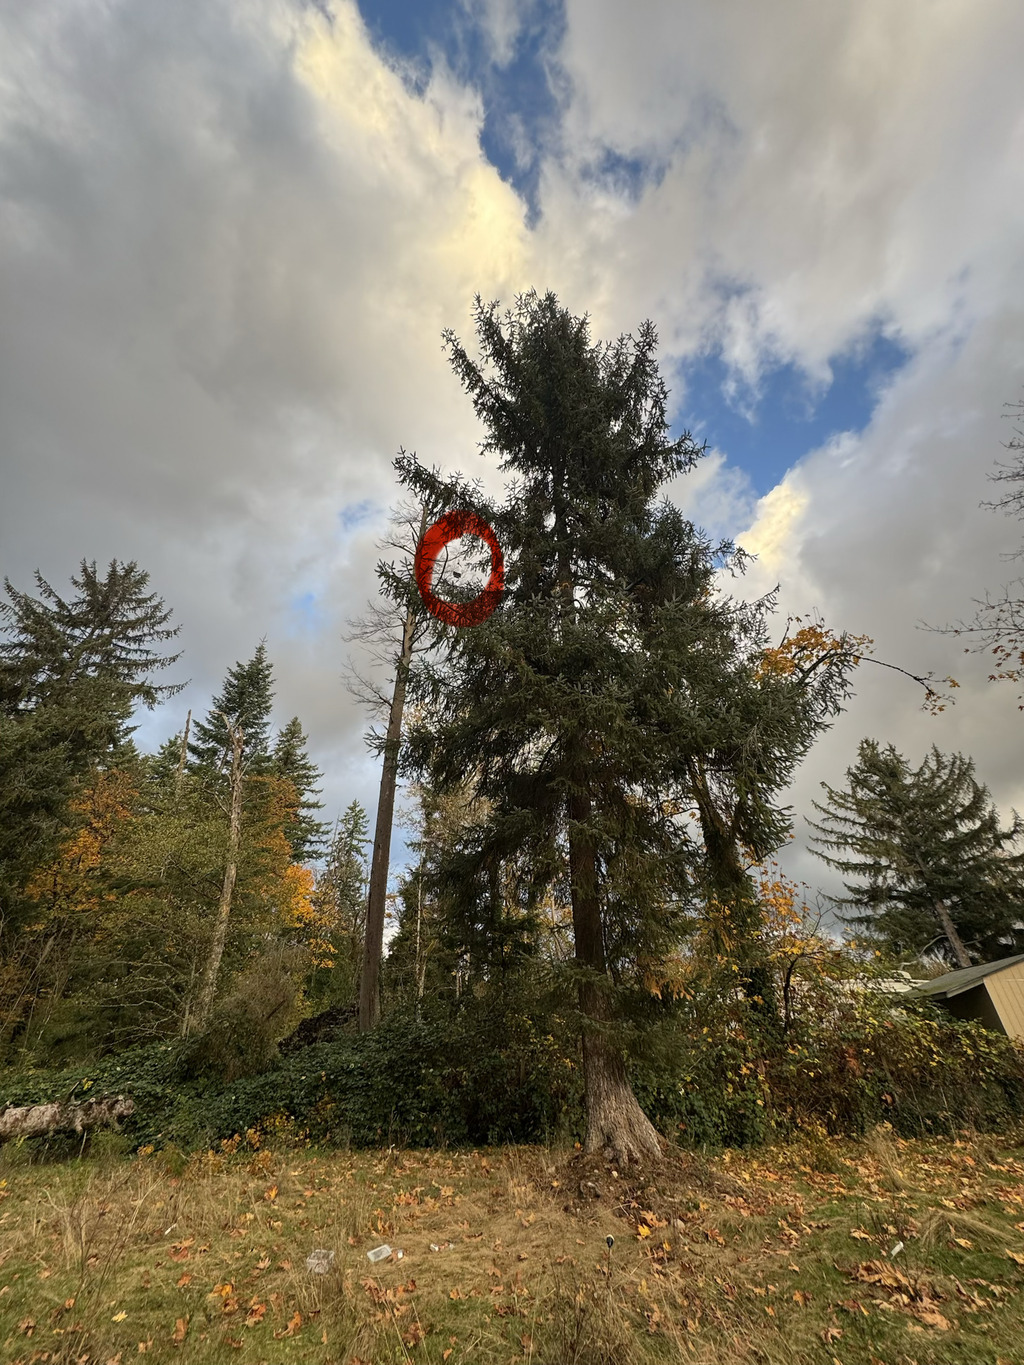
Ah! The weather cleared up for a bit. Today’s the day! Scout out a spot for your node (and make sure it’s okay to put it there). The ideal location is a very tall tree with a branch sticking out that you could easily shoot a projectile over. It helps to have a clear spot on the other side so you don’t lose your line if you miss.
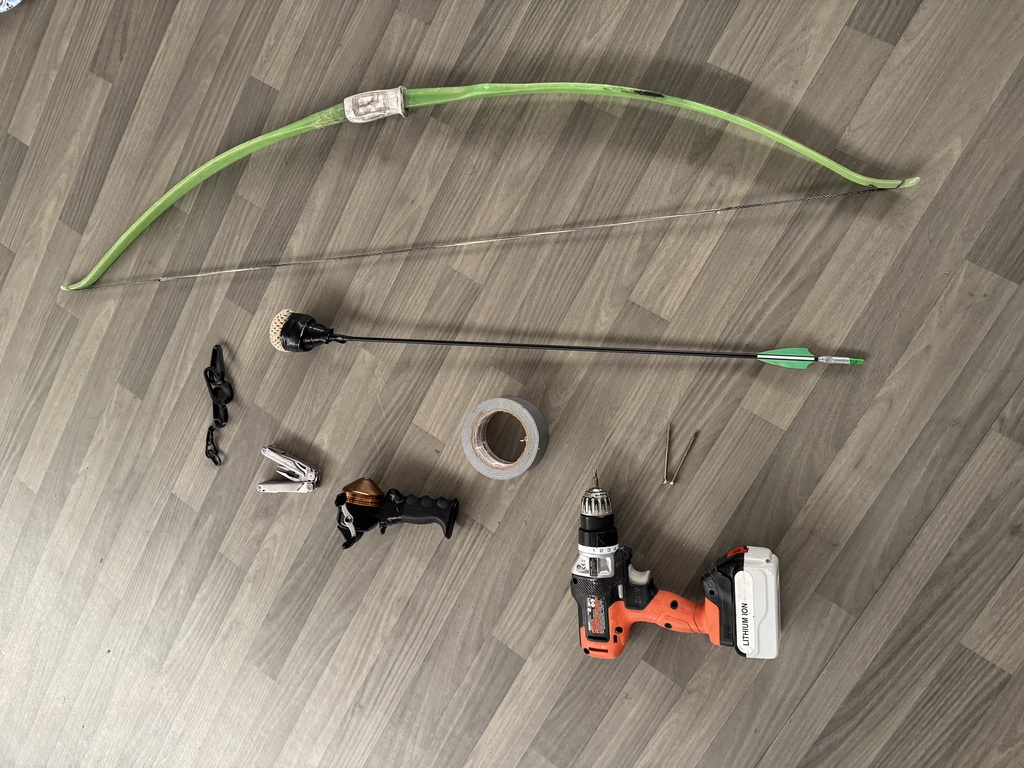
Here’s what I bring with me to hang a node:
- A bow and arrow. I’ve modified my arrows to be foam-tipped for safety. You could also use a slingshot, or crossbow, or potato gun, or just tape a rock to the rope and throw it. Get creative!
- A fishing reel with line. I mounted mine to a broken slingshot handle.
- A drill and a pair of 3-inch screws, needed to fasten the spool.
- Duct tape
- Leatherman multitool
- Carabiners (I like the 3d-printed carabiners from _sh.)
- 200 feet of 2-mm paracord
- The node and spool, of course
The general process of hanging a node is:
- Find a spot
- Attach the fishing line to the arrow’s backend using duct tape. Don’t tie a knot! If the arrow gets stuck, you can pull the line off the arrow and it will fall back to the ground.
- Release the fishing reel’s lock.
- Shoot the arrow over your target branch.
- Where the arrow reaches the ground again, knot the paracord to the fishing line.
- Reel the fishing line back, pulling the paracord up and over the branch.
- Remove the fishing line from the paracord and attach the paracord to the node’s tri-hanger
- Put the other end of the rope through the arm’s opening to lock the rotation.
- Pull the rope down, and the node will go up.
- Take note of the orientation, and let the node back down to adjust the arm angle if necessary.
- Tie the rope to the cleat on the spool and wind up the excess.
- Done! Take photos and test your new node deployment!
… also, make note of your node’s location. They can be really hard to see from the ground :D
Appendix: Sample parts list
There are a lot of variations of node hardware, but here’s a minimal sample list that will net you a cheap solar node in a tree.
Main components
- MCU: Nice!Nano compatible ProMicro nRF52840 microcontroller ($3)
- Radio: Ebyte E22-900M30S ($10)
- Antenna: Generic whip antenna ($5)
- Battery: EBL protected button-top 18650 ($10)
- Solar panel: Generic 10W 5V USB-C panel ($15)
- Case/hanging hardware: 3D printed tree case, hanger, carabiners, and spool (~$3 in plastic)
Additional hardware
- 200ft 2mm 100-lb test paracord ($8)
- 2x 3” wood screws ($1)
Tools
- Soldering workstation
- Drill
- Fishing pole w/ line
- Bow and arrow or similar
- Duct tape
- Knife or multitool